Monday 28 November 2016

The living room floor

Sanded, polished and varnished. Job done!
This weekend, the living room floor was finally finished.

After months of inactivity (in DIY terms at least), failing to finish the sanding and general busyness doing other things, we finally managed to varnish the floor, and now it looks great.

It was spring of this year when we first decided to pull back the old carpet, to find out what sort of state the floorboards were in and whether it was worth having them exposed.

It was a tough, dirty job to scrub off the old felt underlay that had been glued to the boards, possibly for decades. Hours of steaming with a wallpaper remover, scrubbing with sugar soap solution and scraping later, the dirty, dusty and in parts cat piss-infused underlay was removed and the wooden boards were at last revealed.

Before sanding
They weren't a pretty sight! The boards were dirty, discoloured and flecked with old paint. Clearly they would need sanding, and then varnishing or painting if they were going to be on show.

And that was the situation all through the summer, as we did very little DIY, apart from painting the walls. We carried on with our lives, with depressingly dirty old boards on display in the most-used room of the house.

Last month we made time for the job, hired a floor sander and got stuck-in to the dirty, dusty, slightly back-breaking (but immensely satisfying) job of sanding the boards. Although as I mentioned in an earlier post, I had naively chosen not to hire an edging sander at the same time, thinking I could do the parts the drum sander couldn't reach with a hand sander.

Sanding completed, ready for varnishing
Mistake rectified last week (edging sander hired, sanding completed, back on with the dust sheets to protect the floor), the boards were ready to receive the varnish.

So the dust sheets came off, the floor was hoovered thoroughly and the boards were wiped down with white spirit.

3 coats of Ronseal medium oak varnish later, the job is done. Of course, now we have to do the skirting boards again, and the room is still not finished, but it is at least ready for the next job - and this year's Christmas tree!

Tuesday 22 November 2016

The garden - how it begins

How the back garden looked at the start
Gardening is a new hobby for me. I've never had more than a small, decked balcony before, so it's a new experience to have a whole outdoor space to deal with.

A garden was a must-have criterion for us when we were searching for a house, even if that meant being a little further away from the centre of town. You just can't beat having a great barbecue in your own garden, as much as we used to love lugging everything down to the beach (and back) once a week in the summer.

Our little house has two gardens in fact - a very small area out the front and about 50m² at the back.

The first little planter to go
When we moved in, it was clear that the previous owners had been quite keen gardeners, but also clear that they hadn't updated the garden in some years. Apart from a large, shady bed running down the north-facing side, the main features of the garden were a number of raised brick and concrete beds, a small, unloved, lumpy and patchy lawn with a paved path weaving down the middle, a large and slightly dilapidated old shed and a large, overgrown and silted-up pond, made in the same style as the brick and concrete beds.

There's also an old patio that is on such a slope that you can't put a table on it without propping up one side of it with bricks (at least not if you want to use it).

Now the pond gets it!
Clearly, it needed (and very much still needs) a bit of work.

Having not done any gardening before, I had no idea where to start or what to do first. One thing I did know though, is that the pond had to go. I'm not keen on the old raised beds either, so breaking up these old structures was top of my list.

Going...
So far I've smashed up the pond, a small raised bed near the bottom of the garden and a large one next to the house. I have lugged close to a ton of concrete and earth down to the tip, in multiple trips, but still have a garden full of bricks that need to go.

And of course, the best thing about living in a mid-terrace is that everything has to go through the house.

Two large raised beds remain - I've bunged a few plants in them for now, and a good number of spring flowering bulbs have also gone in.
Gone.

The only other substantial change so far is a new fence we had to put in after the old one blew down.

Next, the patio. I did consider having a go myself, but we've decided at the same time to have the steps down from the house to the garden (we live on a hill) redone, which isn't a job I can tackle, so it makes sense to get a landscaper in to the do whole job for us. They're going to rebuild the steps, changing the design of them, grub-up the old patio and replace it with a new one which will extend the whole width of the garden, covering up the space where the pond used to be.

As for the rest of it - I don't yet know, but it may involve a fair amount of gravel and wooden planters. And a new shed at some point.

Sunday 20 November 2016

The living room

It begins with the living room. This is the room we spend most our (waking) time in at home, so it made a good deal of sense to start here.

 How it looked before we moved in
When we moved in, the room looked dated, with plain, creamy wallpaper and a thick old carpet that had clearly seen better days (not to mention a bit too much cat in places). Decades of smoking had given the coving a less-than-attractive yellow-brown hue.

We started on the living room in January of this year (2016). The first job was to strip all the old wallpaper, with a view to painting the walls instead.

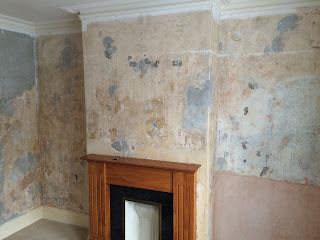
The old, shot plaster
We soon discovered that the wallpaper was doing a good job of covering up some rather old, crumbling and pretty well shot plaster work. A builder's signature over the fireplace revealed that the room was last re-plastered in 1967!

Luckily for us, we have a friend who is a plasterer by trade, so we had the whole room re-done... apart from the ceiling, which we decided to leave well alone, just painting over the old wallpaper instead.

Plastering done and a few mist coats later, the room was ready to paint.

But, in early spring we decided "why not lift up the old carpet and see what sort of condition the floorboards are in?" You can't beat bare boards, if they're in good nick and are painted or stained.

The carpet came up easily enough, but what I hadn't bargained on was how difficult it was to remove an old felt underlay, which had been glued to the boards at some unknown point in the last 50 years or so.

Hours of back breaking, scraping and scrubbing with sugar soap later, the boards were revealed. Blackened in places, covered in paint in others... clearly a floor sander was required.

At this point, summer intervened - we had people to see, places to go, a beach to sit on and lots of barbecues to be had, not to mention a wonderful holiday together, so the DIY mostly stopped. The walls did painted though.

The sanding begins
About a month ago, I finally bit the bullet and hired a floor sander. Sanding the floor was an immensely satisfying, if occasionally frustrating job (a fair amount of swearing is involved when the paper blows-out, for the third time, on a nail that stubbornly refuses to be punched below the board surface).

I naively imagined that I could get away without hiring an edging sander at the same time. We've got a hand sander I thought, so I can just use that to do the rest. This turned out to be a mistake (although I did stubbornly persevere for about 3 hours, using about 15 small sheets of 40 grit paper to do about 3 square feet of floor, until I could bear it no longer)  - which is why I've been doing the rest of the job this weekend with a hired edging sander.

Just the edging to go
Now all that remains is a few corners and a little bit of paint around the edges, so it's back to the hand sander today to finish the job off. Then the floor will be stained, if I can find time between now and Christmas.

The room isn't finished yet, there's still more painting to be done and we have yet to re-furnish, but it's definitely coming along. We're also having shutters installed in the next few weeks - a definite improvement on the old curtains.

Saturday 19 November 2016

Welcome. This blog is about my house, my garden and the DIY and gardening journey that is slowly being undertaken, to make it truly a home.

I live in Brighton, and very happy I am to be here, too.

I've lived in Brighton for over six years now at the time of writing, My wonderful partner (and soon to be fiancée!) has been here for about three.

We bought this house, a two bed terrace in the Coombe Road area, in the Summer of 2015 and although it's in pretty good shape it does need a bit of decorating and updating, as well as a complete overhaul of the garden, to make it the great place we want it to be.

Many people, when moving into a new house (often before they move in) would go on a mad-dash to decorate and update every room first. Not so us. We both work full time and it can be difficult to motivate ourselves into spending our entire weekend slaving away doing DIY, especially when there're so many other demands upon our time - and so many great pubs to spend free time in!

Nevertheless, we manage to find a bit of time and motivation here and there to get stuck-in, and at this rate will manage to do one room every year to eighteen months or so (hardly a break-neck pace). The garden is an ongoing project.

I should also say that not everything I write about will be all our own work - we've already had a friend in to do some re-plastering for us, and the new patio we'll be getting soon won't be done by me (although I did at least consider having a go).

I'll be using this blog as a record for myself, so I can see what's happened to the house and when, over time. I'll post a few before/after and work in progress pics too. I may also use it to waffle on about other things not directly related to DIY. I hope you'll find the blog interesting and at least occasionally entertaining, although I can't guarantee that you'll find the expert advice you may be searching for to complete your own projects!

Do feel free to leave a comment on the site if you want to say hi, or to let other readers know about your own DIY or gardening blog.